| A Tinkerer's Guide to 35, part 4 |
|
Repairing an Atwater Kent Model 35
© 2008, Richard Fairbanks
|
|
Those RF transformers still needed attention but I turned to case cleanup. Badly weathered knobs got a careful polishing with Brasso (yes, Brasso the metal polish) to restore their shine and smooth surface. They look very good now; their measles-like spots are practically invisible. The crinkle paint’s chalky oxidation and some other spots came off with auto rubbing compound. A number of scrapes and dings were left alone, though. The radio was a rusty piece of junk before I started and my goal was to make it presentable, not “like new”. A few hours of rubbing and meticulous cleaning followed by an application of Howard’s Feed-N-Wax brought out its revitalized smudge-maroon brown luster. Whatever rust was still there, inside those pits and dings, seemed to match the brown paint. An application of wax would help retard further corrosion. Inside the case, where water had pooled and rusted, I simply wiped away as much rust as possible. I could have removed the rust and repainted or sprayed clear lacquer but instead I’ve decided to embrace my radio’s long lifeline. Besides, the rust is not normally visible and is relatively harmless.
|
It was time to tackle those RF transformers. They were filthy and two of them needed repair. Each transformer was unique. Besides having slight differences in their physical construction and mounting hardware, each had a different number of coil turns. The number of turns is not documented so I took a couple of close up pictures of the damaged transformers. By zooming in it was easy to see how many turns were originally there. Unfortunately I did not have the correct wire size on hand. The finest coil wire I have is 32 gauge but these transformers had a more narrow size for the primary windings, I’ll guess between 36 and 40 gauge. Undaunted was I! For one thing, the primary windings are relatively short. They had been 14 turns on RFT-2 and 9 turns on RFT-3. The primaries are connected to each RF tube’s plate output, where a slight change in resistance or impedance due to a few turns of larger wire would, I speculated, not matter much. As long as I used the same number of turns, the “turns ratio” would be correct.
There was another consideration, though. Turns ratio, a simple mathematical relationship of the number of turns of a transformer’s primary and secondary coils, is only one aspect of a transformer’s performance. At radio frequencies physical properties become important. If the size of a coil is changed by using larger diameter wire, the larger size will interact differently than the original. I had no idea how much of a change there would be but I gambled that it would be small. The frequencies used for AM radio are so low in the spectrum that circuits should not be super sensitive to such tiny changes.
|
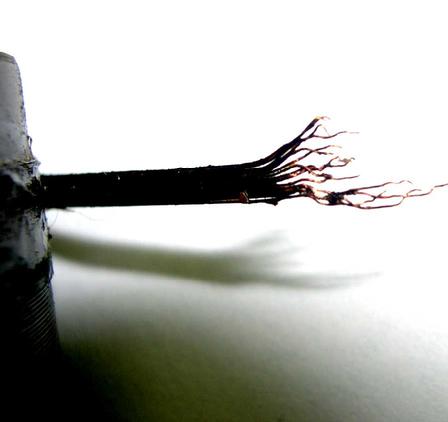 |
| Shredded primary coil on RFT-2 |
|
|
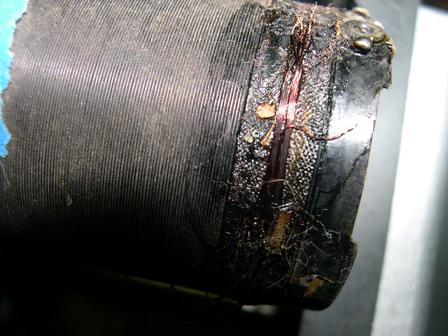 |
| Primary damage on RFT-3 |
|
|
I had to add a couple inches of wire to RFT-2’s broken secondary in order to restore a few missing turns and reconnect it to its terminals. Before winding new primaries I double-checked that they should be wound in the same direction as on RFT-1. From what I could see of the damaged windings, backed up by the schematic, it was a proper assumption.
|
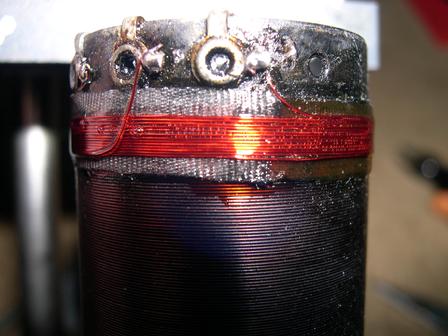 |
| RFT-2 new primary |
|
| A layer of insulating material that originally separated primary and secondary coils had to be repaired on both transformers. RFT2 was missing about half of the layer while RFT3 needed a new insulator. Cloth medical tape from the local discount pharmacy matched the original pretty well, in appearance and thickness. I colored it with a black permanent marker. You can see in the photo of RFT2 where new cloth meets the original.
My new wire’s color does not match the original at all, though. Some restorers would mix a custom-colored lacquer to paint over and mask the mismatch. I might have gone to that length if I felt this radio was worth the time and effort. Instead, a couple of coats of clear finger nail polish will show off my new work, seal out moisture, and keep the new wire in place. Good old finger nail polish! I’ve used it for decades in all sorts of ways. It is easy to use, comes in all colors, and comes with a handy built in applicator! I probably could have found a color that closely matches the old wire (either with or without sparkle dust!) but I am proud of my new coils and want to show them off. next
|
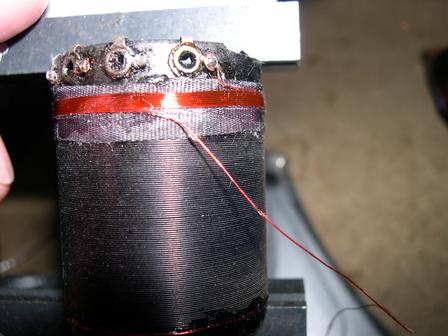 |
| Winding a new coil on RFT-3 |
|
|
|
|